Friday, February 27, 2015

Spinach Mushroom & Feta Crustess Quiche (Pinterest find)


Here is another Pinterest find for myself once I get my shopping lists together, which is harder for cooking in my eyes. This just looks yummy and was found on the budgetbytes.com website.

Spinach Mushroom Crustless Quiche


This recipe comes from 2011, so I would ignore the prices on the site because inflation happens, but the same possibility exists for when you look for sales.  

Ingredients
  • 8 oz. fresh mushrooms $1.99
  • ½ tsp minced garlic $0.06
  • as needed non-stick spray $0.02
  • 1 (10 oz.) box frozen spinach $1.09
  • 4 large eggs $0.83
  • 1 cup milk $0.39
  • 2 oz. feta cheese $0.87
  • ¼ cup grated parmesan $0.39
  • ½ cup shredded mozzarella $0.50
  • to taste salt & pepper $0.05
Instructions
  1. Preheat your oven to 350 degrees. If your frozen spinach is not already thawed, thaw it in the microwave. Empty the box into a colander and let it drain while you begin to prepare the rest.
  2. Quickly rinse the mushrooms and slice them thinly. Place the sliced mushrooms in a skillet coated with non-stick spray, add the minced garlic, and sprinkle a little salt and pepper. Turn the heat on to medium-high and saute the mushrooms until they release all of their moisture and no more water remains on the bottom of the skillet (5-7 minutes).
  3. Spray a pie dish with non-stick spray. Squeeze the rest of the water out of the spinach and spread it out on the bottom of the pie dish. Next add the cooked mushrooms and crumbled feta.
  4. In a medium bowl whisk together the eggs until fairly smooth. Add the milk, parmesan, and another small sprinkle of pepper. Whisk to combine. (This step can be completed while the mushrooms are cooking) Pour this mixture into the pie dish over the spinach, mushrooms, and feta.
  5. Sprinkle the shredded mozzarella cheese over top. Place the pie dish on a baking sheet for easy transfer into the oven. Place the quiche into the preheated oven and bake until it is golden brown on top and the center is solid. Every oven is different but this should take between 45 minutes and an hour. Slice and serve!


Can't wait to try.


Saturday, February 21, 2015

The Pintrest Chicken Dinner that I did make.

I posted a few chicken dinners I wanted to try.  Well, I did try the following recipe:

From the Delicious as it Looks Blog. 

Loaded Baked Potato & Chicken Casserole
Photo From the Delicdious as it Looks Blog

Let's just say it was delicious.  Had a minor issue where a step was skipped accidentally and it still came out delicious.  It's seemed to me on the spicy side, but absolutely would make it again as a come comfort food. Next time, I would though substitute heavy cream with something else, not known now, but will research it and pass it on.

Recipe can be found here

Saturday, February 14, 2015

Pinterest Chicken Recipes I want to try.

Found these on Pinterest that I want to make an effort to make.
Click on the titles under the image to get the direct link to the source I found it on.

From Cooking with Curls.

This one makes my mouth water.

Chicken au Champagne


From Carl's Bad Cravings

This looks yummy and might get me the courage to try Mango.


Cashew-Coconut-Chicken-Tenders-main


I tried the following in a restaurant and fell in love with it.  Glad it was portion controlled (fancy restaurants with the food measuring about 2 inches across the plate) because it was AWESOME!!! My first time having capers, yum!!! Maybe I am getting courage to try new things.  Almost.  But can't wait to try to make it myself for a special occasion.   

Lemon Butter Chicken (no capers in this one but will figure that one out).
From Damndelicious


Lemon Butter Chicken - Easy crisp-tender chicken with the creamiest lemon butter sauce ever - you'll want to forget the chicken and drink the sauce instead!


Carl's Bad Cravings.


Skinny-General-Tso's-Chicken-main01

Think this is a great start.

Have a great day!

Suzzi


Saturday, March 8, 2014

I love changing furniture, so why is it hard to change what I want about myself?

I am a pinterest nut. So much to love about it; project research, inspiration, and among many other reasons it is introduction and reminders. The reminders are subtle hints at first. Then it starts to tug at your subconscious and I saw the following picture and knew it was time to challenge myself and the first step is to write about it and make it public so I will be accountable for success or failure. 


Do it now
 

So if I love changing furniture around once a month, then why is it hard to change what I want about myself?

One, because I want it to be. I want to fight it.  Simple as that.  So, I just took my first step.  Admitting it.  It takes more effort to fight it then successfully improving myself (hence; it takes more muscles to frown than smiling).  Maybe it's afraid of failing or finding what's on the other side; happiness.  It comes down to deciding "Yes,  I am doing it."  The initiating, and follow through is a consequence of deciding yes and can't proceed without the personal decision from me.  No one else can do it.  I even have the Lord in my corner and its still hard. Again,  it's my decision.  I can't fathom that. I have total support and I should embracing it but don't. 

My new year starts now.  The decision is now. No more hiding and depression is not an option anymore.  Just not.   This sign I will carry internally with me from now on, because I have so many Laters that became Nevers and that won't happen anymore.

Looking forward to today and yes, I am going to change the furniture today because it is a start.

Suzzi


Saturday, April 13, 2013

Filling a piping bag with pancake batter dispenser.

Note: I am not paid to endorse this product this is just an opinion and offering a tip on another way to use it. 


Last year, I purchased from Bed Bath and Beyond this with one of my 20% off coupons I receive in the mail from them.

Chicago Metallic Batter Dispenser - 4-Cup Capacity


My intention was not to purchase it for pancake batter (hub makes those as I am an "impatient baker").  The intent was for using this item for pouring cake patter into the cake pops machine I had gotten.  It works great for that except the back row of the machine.

Fast forward to a birthday and my daughter wanted a home made cake this year. So I put on my 'be patient for this one time hat' and made  a cake. Wished I had taken pics of it I did the following zebra cake for her (inside turned awesome!!)  from pinterest. (Thanks for pinning this chickabug it made my daughter's day)


Now on to the tip.

For the frosting the cake, I cheated and use a pre-made ones, but I still was decorating the cake with pipping bags to decorate the edge of the cake. So I turned to the pancake batter dispenser to fill the pipping bag.  

You will need:
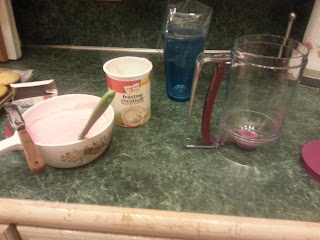
  1. A long cup for the depth of pipping bag and how much frosting will be poured on it. (For me: its the blue one in the back of the pic - pipping bag is clear)
  2. Dispenser
  3. Frosting. I had to mix color into the white frosting (So additional kitchen items used).


Steps
  1. Fill dispenser


   2. Place dispenser on top of cup with pipping bag and pour into it.


Why dirty an extra dish for that? Because I got NO frosting on my hands and it made it mess free (seriously)!  

Maybe not the most exciting tip, but for me filling those pipping bags are messy  when twisting them shut before using. This kept the top clean and no frosting coming out of the top when using. BONUS.

Hope you have a great day.