Friday, February 27, 2015

Spinach Mushroom & Feta Crustess Quiche (Pinterest find)


Here is another Pinterest find for myself once I get my shopping lists together, which is harder for cooking in my eyes. This just looks yummy and was found on the budgetbytes.com website.

Spinach Mushroom Crustless Quiche


This recipe comes from 2011, so I would ignore the prices on the site because inflation happens, but the same possibility exists for when you look for sales.  

Ingredients
  • 8 oz. fresh mushrooms $1.99
  • ½ tsp minced garlic $0.06
  • as needed non-stick spray $0.02
  • 1 (10 oz.) box frozen spinach $1.09
  • 4 large eggs $0.83
  • 1 cup milk $0.39
  • 2 oz. feta cheese $0.87
  • ¼ cup grated parmesan $0.39
  • ½ cup shredded mozzarella $0.50
  • to taste salt & pepper $0.05
Instructions
  1. Preheat your oven to 350 degrees. If your frozen spinach is not already thawed, thaw it in the microwave. Empty the box into a colander and let it drain while you begin to prepare the rest.
  2. Quickly rinse the mushrooms and slice them thinly. Place the sliced mushrooms in a skillet coated with non-stick spray, add the minced garlic, and sprinkle a little salt and pepper. Turn the heat on to medium-high and saute the mushrooms until they release all of their moisture and no more water remains on the bottom of the skillet (5-7 minutes).
  3. Spray a pie dish with non-stick spray. Squeeze the rest of the water out of the spinach and spread it out on the bottom of the pie dish. Next add the cooked mushrooms and crumbled feta.
  4. In a medium bowl whisk together the eggs until fairly smooth. Add the milk, parmesan, and another small sprinkle of pepper. Whisk to combine. (This step can be completed while the mushrooms are cooking) Pour this mixture into the pie dish over the spinach, mushrooms, and feta.
  5. Sprinkle the shredded mozzarella cheese over top. Place the pie dish on a baking sheet for easy transfer into the oven. Place the quiche into the preheated oven and bake until it is golden brown on top and the center is solid. Every oven is different but this should take between 45 minutes and an hour. Slice and serve!


Can't wait to try.


Saturday, February 21, 2015

The Pintrest Chicken Dinner that I did make.

I posted a few chicken dinners I wanted to try.  Well, I did try the following recipe:

From the Delicious as it Looks Blog. 

Loaded Baked Potato & Chicken Casserole
Photo From the Delicdious as it Looks Blog

Let's just say it was delicious.  Had a minor issue where a step was skipped accidentally and it still came out delicious.  It's seemed to me on the spicy side, but absolutely would make it again as a come comfort food. Next time, I would though substitute heavy cream with something else, not known now, but will research it and pass it on.

Recipe can be found here

Saturday, February 14, 2015

Pinterest Chicken Recipes I want to try.

Found these on Pinterest that I want to make an effort to make.
Click on the titles under the image to get the direct link to the source I found it on.

From Cooking with Curls.

This one makes my mouth water.

Chicken au Champagne


From Carl's Bad Cravings

This looks yummy and might get me the courage to try Mango.


Cashew-Coconut-Chicken-Tenders-main


I tried the following in a restaurant and fell in love with it.  Glad it was portion controlled (fancy restaurants with the food measuring about 2 inches across the plate) because it was AWESOME!!! My first time having capers, yum!!! Maybe I am getting courage to try new things.  Almost.  But can't wait to try to make it myself for a special occasion.   

Lemon Butter Chicken (no capers in this one but will figure that one out).
From Damndelicious


Lemon Butter Chicken - Easy crisp-tender chicken with the creamiest lemon butter sauce ever - you'll want to forget the chicken and drink the sauce instead!


Carl's Bad Cravings.


Skinny-General-Tso's-Chicken-main01

Think this is a great start.

Have a great day!

Suzzi


Saturday, March 8, 2014

I love changing furniture, so why is it hard to change what I want about myself?

I am a pinterest nut. So much to love about it; project research, inspiration, and among many other reasons it is introduction and reminders. The reminders are subtle hints at first. Then it starts to tug at your subconscious and I saw the following picture and knew it was time to challenge myself and the first step is to write about it and make it public so I will be accountable for success or failure. 


Do it now
 

So if I love changing furniture around once a month, then why is it hard to change what I want about myself?

One, because I want it to be. I want to fight it.  Simple as that.  So, I just took my first step.  Admitting it.  It takes more effort to fight it then successfully improving myself (hence; it takes more muscles to frown than smiling).  Maybe it's afraid of failing or finding what's on the other side; happiness.  It comes down to deciding "Yes,  I am doing it."  The initiating, and follow through is a consequence of deciding yes and can't proceed without the personal decision from me.  No one else can do it.  I even have the Lord in my corner and its still hard. Again,  it's my decision.  I can't fathom that. I have total support and I should embracing it but don't. 

My new year starts now.  The decision is now. No more hiding and depression is not an option anymore.  Just not.   This sign I will carry internally with me from now on, because I have so many Laters that became Nevers and that won't happen anymore.

Looking forward to today and yes, I am going to change the furniture today because it is a start.

Suzzi


Saturday, April 13, 2013

Filling a piping bag with pancake batter dispenser.

Note: I am not paid to endorse this product this is just an opinion and offering a tip on another way to use it. 


Last year, I purchased from Bed Bath and Beyond this with one of my 20% off coupons I receive in the mail from them.

Chicago Metallic Batter Dispenser - 4-Cup Capacity


My intention was not to purchase it for pancake batter (hub makes those as I am an "impatient baker").  The intent was for using this item for pouring cake patter into the cake pops machine I had gotten.  It works great for that except the back row of the machine.

Fast forward to a birthday and my daughter wanted a home made cake this year. So I put on my 'be patient for this one time hat' and made  a cake. Wished I had taken pics of it I did the following zebra cake for her (inside turned awesome!!)  from pinterest. (Thanks for pinning this chickabug it made my daughter's day)


Now on to the tip.

For the frosting the cake, I cheated and use a pre-made ones, but I still was decorating the cake with pipping bags to decorate the edge of the cake. So I turned to the pancake batter dispenser to fill the pipping bag.  

You will need:
  1. A long cup for the depth of pipping bag and how much frosting will be poured on it. (For me: its the blue one in the back of the pic - pipping bag is clear)
  2. Dispenser
  3. Frosting. I had to mix color into the white frosting (So additional kitchen items used).


Steps
  1. Fill dispenser


   2. Place dispenser on top of cup with pipping bag and pour into it.


Why dirty an extra dish for that? Because I got NO frosting on my hands and it made it mess free (seriously)!  

Maybe not the most exciting tip, but for me filling those pipping bags are messy  when twisting them shut before using. This kept the top clean and no frosting coming out of the top when using. BONUS.

Hope you have a great day.


Wednesday, April 3, 2013

4 you tag

Was doodling today and added a quick tag that I threw together. 

Sorry about the photo quality - this appears real soft and lighter taupe IRL.


Thanks for looking.

Monday, April 1, 2013

quicky lunch note

I love putting notes in my kiddo's lunch, but just wanted to share something I did different than a normal scrap piece of paper. 


I just made sure that a napkin was underneath.  I think smiley faces are on the next round.


May you have a happy day.

Sunday, December 23, 2012

Project: Lamp

 I found two white base lamps with a pink and white polka dot shades last Christmas. 

For my daughter's room (which is transcending into zebra accents), I thought about adding zebra ribbon along the top and bottom with jewels (hot glued) added as well.  The lamps were on clearance at Meijer's and I think I paid $10 each and the ribbon and jewels at Hobby Lobby. 


(Layout courtesy of Photogrid app).
 
Can't wait for her room to finished to share.  It is just hard to go from a toddler's room to a more grown up room, especially when it is the baby of the family.
 
Thanks for looking.


Merry Christmas

Merry Christmas and God Bless all.

~ Suzzi ~
 

Saturday, September 1, 2012

Fall ~ Mini Card

Here is a fall card, I tried practicing my coloring with copics.  Not the greatest - but practice will make perfect -  also with the lighting on the card - room has terrible lighting for picture taking.


Still working on something for cutting files - in the testing portion and can't wait for the reveal. 

(hint:going to be great for those christmas cards for all). 

Have a great day!

Tuesday, July 24, 2012

Finally, Graduation!

I finally graduated from college in forensic accounting and reaaaady to craft.  I have something special coming up for those who like to send out Christmaso photocards.  Also, glad to say that I am going to be able to add files for the Sihouette Cameos users.

Until then blessings for you all.

Suzzi

Wednesday, July 4, 2012

Happy Fourth of July

File:US F...

Let Freedome Ring!

Happy Birthday America. 
 THANKS to the troops for your service, to whom I wouldn't have
what I have without your fight.  Thanks again to all Vet, Active and In-Active.

Note to self: Just one more month until

no more school for me.  After 3,000 words to be typed and an oral presentation, I will at last get to craft.  I must have at least 20 new cuts I created but never tested.  So I hope to get them here soon.  Graduating has its bittersweet memories for me and looking forward to getting things done.

Typing my finish here makes it feel as though it will go fast. I never wish time to go fast except for the class (great teacher, but senioritious is upon me!).

Note to self: later.

Thursday, April 26, 2012

Graduation is upon us and with two classes to finish for my degree, I am excited for it to be over.

NOTE to self: Get back to crafting.

NOTE to note: I can't wait.

Happy Mother's day in advance to all!

Wednesday, November 23, 2011

Finally - a new cutting file - WOW!

I was working on a banner and when I cut it - it turned out to be a perfect napkin ring instead. 

The file is available at the end of the post.

Each have a top layer and a bottom layer.  The first is a three snowflake napkin ring and the multi-snowflake napking ring.  Take a peak and follwing will be some tips on how to make this easy! Each file has a tab at one end and a slit in the other end for easy assembly.


~~~~TIPS ~~~~
1 - I used packing tape to the back of the top layer.
It is the perfect size to cover the snowflake.  It is easier
to cut the tape and lay it down to avoid wrinkles.


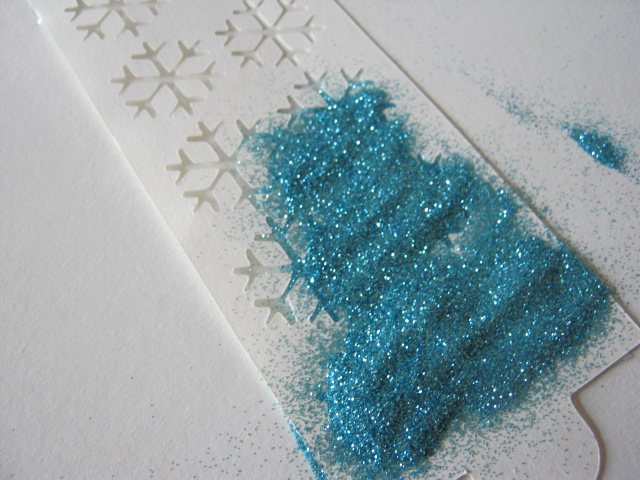
2. I used glitter (pour on top, lay paper on top and
rub it to get the glitter in to the snowflakes.)


Shake off the glitter and then wipe off any glitter that
doesn't come off with a paper towel to get the results below.


Here is the file (all four on individual layers, 2 tops and 2 backgrounds).  There are for personal use only and feel free to send others that may want the file to retrieve it from this location. Thanks so much for that.


MTC 3.3.3 file is Here
PDF file is Here
SVG file is Here


If you want to keep them year after year - simply laminate.

HAPPY HOLIDAYS!


Pin It

Thursday, July 14, 2011

Sew Happy pocket tag

I loved how this came out and the colors that came as I progressed.


I got the binding from a garage sale and I then used the Xyron runner to create the "happy" saying on it.


The red torn paper - has sewing patterns on it and isn't busy. I had saved (or should I say hoard) this for at least six years and so glad I did. Now what to do about the scraps left from it. Sewing image source is listed below. 


The Sew was printed out just on MSWord or regular (gasp) paper, then distress with the Mustard Seed Tim Holtz Distress ink. The tag was made with a dotted stamp and embossed with clear powder.  The border is Martha Stewart.
This is a button that can be considered green.  I punched a circle from a magazine image using the Epiphany Crafts punch - Round 14 button size.

Thanks for looking!


Sewing Clipart Source: University Society Editorial Board, Boys and Girls Bookshelf (New York: The University Society, 1920)4:208

Photobucket

Sunday, January 2, 2011

Happy New Year

I hope that you all had a pleasant and wonderful holiday season. 

I had a whirlwind of a time the last three months and ready to get back
to creating. There are some surprises in store and can't wait to share them soon, so make sure to
check back soon.

Be safe, prosperous, and happy this new year.


God Bless,
Suzzi


Friday, August 27, 2010

Spider Frame Share

After getting my Cricut back from Provo (thanks) and seeing the MTC yahoo group Martha Stewart ribbon word thread, I started to get my juices flowing.

You won't believe what I came up with, but its out for testing at a special lab right now and you'll have to keep watching very soon for them (Ok, September 15!)

For now I have a quick one to share.

Simply click on the file below to download


Please only use these files for personal use and if want to share, please send them to here directly.  Make my day and share a comment and hopefully the file makes yours. Thanks for looking and have a great weekend.